Configuring Pane Layout
You can configure the states and locations of your panes to create a pane layout that suites your needs and style.
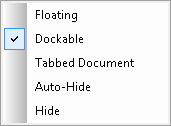
The buttons in the top right corner of a pane let you configure the pane's layout.
Note: You can also change some panes' states to Floating, Tabbed, or Docked by dragging them to a new location in the Designer.
| Button | Description |
|---|---|

|
Allows you choose one of five states for a pane from a drop-down
|

|
Toggles auto-hiding on and off. |

|
Closes the pane. |

Note: Some panes can only be in certain states. For example, in the Workflow Designer, the Common Searches Pane, Minimap Pane, Properties Pane, Search Pane, and Toolbox Pane cannot be tabbed. Also, some panes must be Docked before they can be Auto-Hidden, Tabbed, or Floating.